2. Permissions
To use the application, you need to authorize the browser to access the webcam and MIDI. Without these permissions, the application will not be able to detect movements or send MIDI messages. When prompted by the browser, allow access to the webcam and MIDI port.
3. MIDI port selection
At the top left, there is a dropdown menu to select the MIDI port. The first available port is automatically selected and activated.
4. Use the webcam or upload a video
- By default the application uses your main webcam. If you want to upload a video, click on “Load video file” and select a file to upload
- You can change clock speed in Beats Per Minute by updating the values of BPM 1 and BPM 2
- When you are ready, you can click on “Start” button and the sequencer will begin to work
- You can click the “Fullscreen” button to watch the video on full screen width (then click the ESC or F11 key on your keyboard to exit fullscreen mode)
- You can click the “Hide config” button to hide config and log panels
- When you click the “Stop” button, video pauses and the master volume gently fades out
5. Just watch, listen and relax
- This application works as a sequencer. It is intended to explore and contemplate places and spaces and generate soundscapes that evolve as the environment mutates
- It can be used in nature, into the woods, in a crowded city, in a museum, in a classroom or wherever the environment is changing or evolving
6. How does it work
- The screen is divided in a grid of 16×9 cells. The app uses two clocks with different speed to select one cell after the other and analyzes the video footage (from a webcam or a videoclip) in real time
- From each cell many informations are extracted (luminosity, hue, saturation, colors)
- Based on the values of each cell, the app sends MIDI notes and commands through a virtual MIDI port to VCV Rack 2
- The sequencer sends notes to 4 different channels (or instruments). The channel is selected by the luminosity of the cell. The note is selected by the hue
- A total of 16 different MIDI CC messages are sent (4 for each channel). The MIDI CC messages are selected by rgb colors and saturation
- The start/stop button controls the VCV Rack master volume with fading.
- You can look at the Log Panels on the right to see which notes and messages are sent to the virtual MIDI port
7. Online Test with Cardinal (VCV Rack 2 Clone)
Cardinal is a clone of VCV Rack 2. It allows you to simulate EuroRack modules and create patches with oscillators (VCO), filters (VCF), envelopes (ADSR), amplifiers (VCA), sequencers, arpeggiators, effects, and much more. You can control your patches using this application.
Instructions:
- You can test Cardinal without installing it, at this link: https://cardinal.kx.studio/live
- I created a demo patch that you can download by clicking here and then import into VCV Rack 2 via the File > Import Patch menu. The patch is ready to be used and you can start playing right away. You can use the patch also as a template. If you want to use it with Cardinal, you must update some modules. Or you can start by using another template by clicking here or another patch by clicking here
- Warning! You must click the Engine > Enable / Reconnect MIDI menu, otherwise Cardinal will not receive MIDI messages. You’ll also need to authorize MIDI usage when prompted by your browser.
- To map other parameters, right-click on one of the CC encoders, click Map 1 > Start Mapping, and then click on the target parameter you want to control (for example, one of the encoders on a Eurorack module).
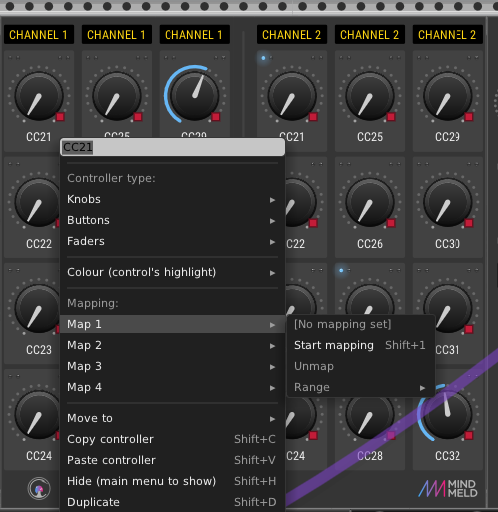
- You can also adjust the range of each parameter by clicking Map 1 > Range and then dragging the range with your mouse.
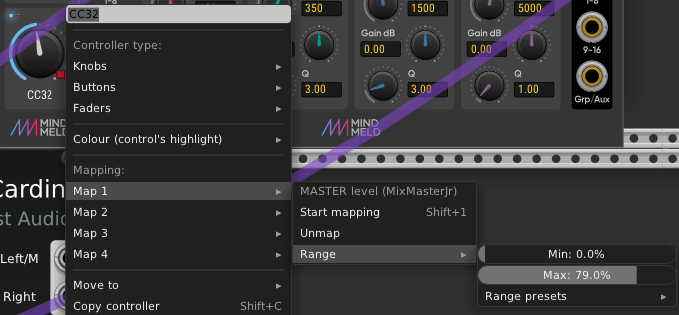
- You can map up to 4 different parameters to each encoder.
- Important! When you’ve finished creating your patch, to use the MIDI interface and make music, you must return to the Hand Tracking MIDI application screen (the one with the webcam). Only when that screen is active can you send MIDI controls to other applications.
- Note! To use Cardinal online, you still need to follow the instructions in section 1. Set up the MIDI Port on your computer