2. Permissions
To use the application, you need to authorize the browser to access the webcam and MIDI. Without these permissions, the application will not be able to detect body movements or send MIDI messages. When prompted by the browser, allow access to the webcam and MIDI port.
3. MIDI port selection and webcam management
At the top left, there is a dropdown menu to select the MIDI port. The first available port is automatically selected and activated. Next to it is a button to show or hide the webcam: hiding the webcam can improve performance if the live video is not needed.
4. Choose webcam and Midi Port, Calibrate and Focus
- You can choose which webcam to use
- You can send notes and MIDI CC Messages to different MIDI Ports and switch them in real time
- You can calibrate colors to get a perfect matching in every lights condition
- You can change camera focus to get better results or to blur the video
- You can set brightness and contrast to improve colors detection
5. Set BPM and number of tracked object
- You can select the maximum number of objects tracked
- If more objects are detected, you can activate random selection (Rnd button = GREEN) or choose the first 4 objects detected (Rnd button = RED)
- You can set BPM Sync to send notes in sync with the selected tempo (BPM button = GREEN) or deactivate BMP Sync
6. Move colored objects: Play Notes and Send MIDI CC Messages
- By moving colored objects within the grid, you can send notes and MIDI messages.
- Black objects send notes on channel 1
- Cyan objects send MIDI messages on channel 1
- Magenta objects send MIDI messages on channel 2
- Yellow objects send MIDI messages on channel 3
- Green objects send MIDI messages on channel 4
- You can check the Log Monitor on the top right corner of the screen to see which MIDI Notes and CC Messages are sent
7. Test with VCV Rack 2 or your preferred Synth or MIDI device
Cardinal is a clone of VCV Rack 2. It allows you to simulate EuroRack modules and create patches with oscillators (VCO), filters (VCF), envelopes (ADSR), amplifiers (VCA), sequencers, arpeggiators, effects, and much more. You can control your patches using this application.
Instructions:
- I created a demo patch for VCV Rack 2 that you can download by clicking here. The patch is ready to be used and you can start playing right away.
- The patch can also be used as a Template to create your own patches. It has all the MIDI Channels, CC Messages and automations already set.
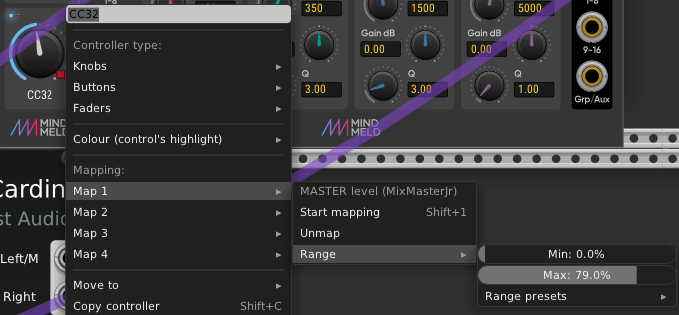
- To map other parameters, right-click on one of the CC encoders, click Map 1 > Start Mapping, and then click on the target parameter you want to control (for example, one of the encoders on a Eurorack module).
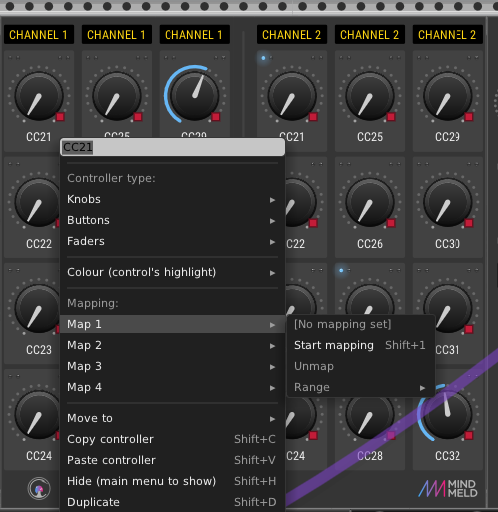
- You can also adjust the range of each parameter by clicking Map 1 > Range and then dragging the range with your mouse.
- You can map up to 4 different parameters to each encoder.
- Important! When you’ve finished creating your patch, to use the MIDI interface and make music, you must return to the Hand Tracking MIDI application screen (the one with the webcam). Only when that screen is active can you send MIDI controls to other applications.