2. Permissions
To use the application, you need to authorize the browser to access the webcam and MIDI. Without these permissions, the application will not be able to detect body movements or send MIDI messages. When prompted by the browser, allow access to the webcam and MIDI port.
3. MIDI port selection and webcam management
At the top left, there is a dropdown menu to select the MIDI port. The first available port is automatically selected and activated. Next to it is a button to show or hide the webcam: hiding the webcam can improve performance if the live video is not needed.
4. Move your Body: Play Notes and Send MIDI CC Messages
- By moving your arms and legs within the grid, you can send notes and MIDI messages.
- The left arm sends notes and MIDI messages on channel 1
- The right arm sends notes and MIDI messages on channel 2
- The left leg sends notes and MIDI messages on channel 3
- The right leg sends notes and MIDI messages on channel 4
- Each limb sends a pair of MIDI CC messages based on its x, y coordinates on the screen
- You can check the Log Monitor on the bottom right corner of the screen to see which MIDI CC messages are sent
5. Move the Sliders to send MIDI CC Messages
- By moving the left wrist over the two sliders on the left you can change their value
- By moving the right wrist over the two sliders on the right you can change their value as well
6. Online Test with Cardinal (VCV Rack 2 Clone)
Cardinal is a clone of VCV Rack 2. It allows you to simulate EuroRack modules and create patches with oscillators (VCO), filters (VCF), envelopes (ADSR), amplifiers (VCA), sequencers, arpeggiators, effects, and much more. You can control your patches using this application.
Instructions:
- You can test Cardinal without installing it, at this link: https://cardinal.kx.studio/live
- I created a demo patch that you can download by clicking here and then import into Cardinal via the File > Import Patch menu. The patch is ready to be used and you can start playing right away. In addition to body movement, you can use the four sliders to adjust the volume of the four instruments
- Warning! You must click the Engine > Enable / Reconnect MIDI menu, otherwise Cardinal will not receive MIDI messages. You’ll also need to authorize MIDI usage when prompted by your browser.
- I also created a template patch to help you start building your own custom patches. You can download it by clicking here and then import it into Cardinal via the File > Import Patch menu.
- This patch already has MIDI input configured to receive 12 MIDI CC messages on channel 1 and 12 MIDI CC messages on channel 2 (in addition to notes). You can control up to 24 different parameters.
- The first two green sliders are already mapped to the faders of the first two mixer channels, and the first two yellow sliders are mapped to the faders of the third and fourth mixer channels.
- To map other parameters, right-click on one of the CC encoders, click Map 1 > Start Mapping, and then click on the target parameter you want to control (for example, one of the encoders on a Eurorack module).
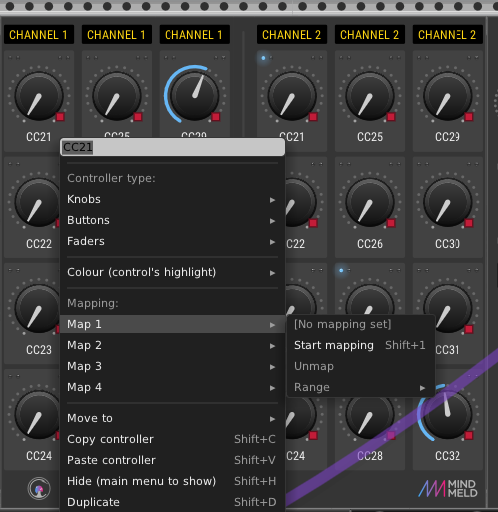
- You can also adjust the range of each parameter by clicking Map 1 > Range and then dragging the range with your mouse.
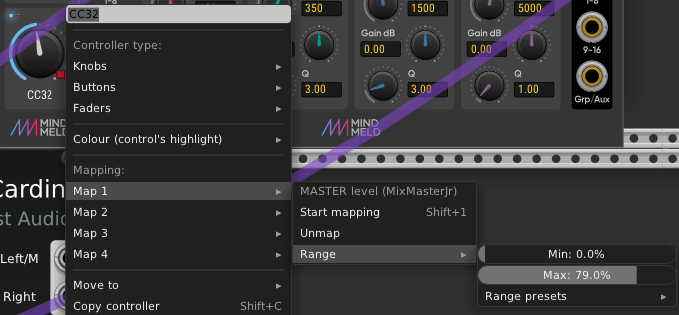
- You can map up to 4 different parameters to each encoder.
- Important! When you’ve finished creating your patch, to use the MIDI interface and make music, you must return to the Hand Tracking MIDI application screen (the one with the webcam). Only when that screen is active can you send MIDI controls to other applications.
- Note! To use Cardinal online, you still need to follow the instructions in section 1. Set up the MIDI Port on your computer
- If you want to use VCV Rack 2, click here to download a patch to use with this interface